We have been listening to the DeepDotWeb community and have seen how popular our article “Is Your VPN Legit or Shit” became, which made us realize that you guys have been in desperate need of some solid advice about VPN’s. For this reason we are introducing DeepDotWeb’s very own section on the Best VPN Service Providers so you can finally have some unbiased information to help you decide what is the best VPN for you to have the ultimate privacy online and on the Deep Web. We are committed to only list those VPN providers that respect your privacy, use encryption, support OpenVPN, have a no logging policy you and prioritize those who accepts Bitcoin. Specific service reviews and live user ratings will be added soon.
There are a lot of misconceptions and false information about VPN’s. Hardly anyone is paying attention as to which VPN providers are best when it comes to privacy, anonymity and compatibility with Tor.
If you are accessing the Deep Web then you need to be using a VPN with Tor to get the very best anonymity and privacy. Sadly, not all VPN’s are equal. There are massive differences in the level of protection you get from different VPN Service providers. Some of them actually log everything you do online which completely defeats the purpose of using a VPN.
It is a surprise to some people about the level of data being recorded by ISP’s and being analysed by Governments and Law Enforcement, this is being carried out on a massive scale that has never been seen before. You need to be hiding all of your tracks, even when on the clear net. Just your normal internet usage can be enough to make a profile and link you to more than you think. Law Enforcement are now even subpoenaing sites like reddit for user details so they can prosecute them for various crimes.
VPN Software has many awesome benefits that is not just restricted to providing you with increased anonymity and privacy while on the Dark Web. You can also use it to:
Keep your internet usage hidden so not even your ISP or Law Enforcement will know what you are doing online.
Download torrents anonymously.
Unblock Netflix, HULU, HBO, Spotify, Pandora etc.
Stream and download your favourite Movies, TV, and music anonymously.
Protect yourself from being hacked when using WiFi.
Use it on any device.
If you care about your privacy then you should really consider using a VPN Service for all of your internet usage no matter what you are doing online. Have any questions, corrections or inquiries? Please contact us.
Disclaimer
DeepDotWeb rankings are based on our technical assessment of, and our personal experience, each product. We are paid commissions from some of the VPN companies on this site for customers referred from this site which convert into sales. The rates paid to us by the VPN providers vary in price.
A security researcher has discovered a critical vulnerability in Facebook that could allow attackers to delete any video of the social networking site shared by anyone on their wall.
The flaw has been discovered by security researcher Dan Melamed in June 2016, allowing him not only to remotely delete any video on Facebook shared by anyone without having any permission or authentication but also to disable commenting on the video of your choice.
Here's how to exploit this flaw:
In order to exploit this vulnerability, Melamed first created a public event on the Facebook page and uploaded a video on the Discussion part of the event.
While uploading the video, the researcher tampered the POST request using Fiddler and then replace the Video ID value of his video with Video ID value of any other video on the social media platform.
Although Facebook responded to this issue with a server error, i.e. "This content is no longer available," but the new video was successfully got posted and displayed just fine.
Once this task was accomplished, Melamed deleted his event post, which eventually deleted the attached video.
And guess what? This in turned removed the video from the social networking site and the wall of the victim.
"You will also notice in the drop down section that there is the option to "Turn off commenting." This allows you to disable commenting on the video of your choice," Melamed writes.
Video Demonstration
[embed]https://youtu.be/GlY_I2ZnNt8[/embed]
For more step by step details about the vulnerability and how it works, you can watch the proof-of-concept video demonstration above which shows the Facebook video deletion attack in action.
Melamed responsibly reported the vulnerability to the Facebook security team, which patched the vulnerability within two weeks at the beginning of this year.
Shortly after patching the flaw, the social media giant rewarded him $10,000 bug bounty for his efforts.
This is not the very first time when such vulnerability has been disclosed in Facebook that could have allowed attackers to delete any video from Facebook. Bug bounty hunters continuously find and report such bugs to keep the social media platform safe and secure.
The new Share feature in Windows was first introduced in Windows 8, and not much has changed in Windows 10. This feature enables you to share documents, emails, images, and other files directly from Windows itself using the Share charm. In fact, most modern apps in Windows 10 make use of this feature to allow users to share things quickly. As good as it is, by default, there is no way to customize what options you see in the Share menu. Microsoft, for whatever reason, chose to hide the customization options. However, you can easily enable it with a simple registry tweak. The following is how to enable the Share settings page in Windows 10.
Check Your Windows Version
One thing you need to know before proceeding is that this trick only works in Windows version 1607 and up. If you don’t know what version you are using, simply press “Win + R,” type winver and press the Enter button.
This action will open the “About Windows” window. Here you will see your current Windows 10 version number. As you can see, I’m using Windows 10 version 1607.
Note: before proceeding, make sure that you have a good backup of your Registry. This allows you to roll back if anything bad happens.
Enabling the hidden share settings page in Windows 10 using the Registry is pretty easy. To start, search for “regedit” in the start menu and open it.
Once the Registry Editor has been opened, navigate to the following location:
HKEY_CURRENT_USER\Control Panel
Slect the “Control Panel” key on the left pane, right-click on the right panel and select the “New” option and then “DWORD (32-bit) Value.”
The above action will create a new blank DWORD value. Name the new value “EnableShareSettings,” and press the Enter button on your keyboard.
By default, the new DWORD value will have “0” as its value data. To change that, double-click the value, enter the Value Data as “1” and click on the “OK” button to save the changes.
This is how it looks when you are done with the changes.
Just restart your system and you are good to go. To see the new Share settings page, click on the Notifications Icon and then select the option “All Settings.” Alternatively, you can also use the keyboard shortcut “Win + I” to open the Windows 10 Settings app.
In the Settings app, navigate to “System.”
Once you are here, you will see a new option called “Share” just below the option “About” in the left panel. If you navigate to the page, you can see the options to enable or disable share items, the number of share options that can appear in a list, etc.
To disable a share item, simply toggle the button next to it.
If you ever want to revert back, simply change the Value Data back to “0” or delete the “EnableShareSettings” value.
Enable Hidden Share Settings Page Using UWT
If you don’t want to meddle with the Registry Editor, you can use the Ultimate Windows Tweaker to do the same thing. Download the application from its official website, extract the folder and execute the .exe file.
Once Ultimate Windows Tweaker has been opened, navigate to the “Customization” tab in the left panel. Here, select the checkbox “Enable Share Page in Settings,” and then click on the “Apply Tweaks” button.
Close the application and restart your system to see the new Share Settings page in the Windows 10 settings app.
To remove the Share Settings page, simply uncheck the option “Enable Share Page in Settings” and apply the tweaks. It is that easy.
Do comment below sharing your thoughts and experiences about using the above method to enable the hidden share settings page in Windows 10.
While using a Windows operating system, you may be plagued with a message that states your Windows is “not genuine.” If you’re using older versions of Windows, the desktop may turn black, a small message at the bottom-right will warn you that it’s not genuine, and you’ll be locked out of viewing the system’s properties. In this case you might be interested in how to fix Windows’ not genuine errors. If this happens to you, there are a few reasons this could have happened.
You’re using a copy of Windows that you downloaded off the Internet for free.
You bought a PC or Windows product key from a seller, and the error message has appeared since first boot.
You bought and used a genuine copy of Windows, but it suddenly claimed it’s not genuine.
The computer’s hardware changed in some way.
Fixing the “Windows is not genuine” error depends on which of the above categories you fall into.
1. If you downloaded Windows off the Internet
One way to get this error message is if you managed to download a copy of Windows off of the Internet without paying. You may have seen an article or a link advertising you can get a Windows operating system “for free,” and liked the sound of it. Unfortunately, while a free copy of Windows does sound great, this is, unfortunately, software piracy!
As of this writing, there’s no legitimate and legal way outside of student plans to download and install a Windows operating system for free. Any methods claiming you can do so are illegal, and as such, the copy of Windows you downloaded is claiming it’s “not genuine” because you didn’t pay for it. This is akin to when people download movies, CDs, and games off the Internet for free. As such, this is not an ideal situation to be in.
What do I do?
If you’re in this situation, what paths of action can you take to rectify it?
For one, it’s still not too late to purchase a legitimate copy of Windows. You can buy the operating system either as a disk from your favourite computer store or as a download or license through the Microsoft store. Once bought, you can use the license to validate your copy of Windows. This will fix Windows’ not genuine messages for good.
Unfortunately, Windows keys don’t come very cheap; they usually sell for around $100-$200. If you need an operating system for your computer but don’t have the money for one, you can always try Linux instead. Linux operating systems are available to legally download free of charge, so you can use them without being hassled for money. You can read our beginner’s guide to Linux distros to get an understanding of what they can offer you.
If you’re using an operating system older than Windows 10, you may be able to rearm the license so you can continue to use it. To do this, open a command prompt and type slmgr -rearm in it. Be warned, however – this will only reactivate Windows for 30 days, and you can only do it three times, so use this only as a temporary solution to fix Windows’ not genuine messages while you get a more permanent fix sorted.
2. If you bought a computer or key with the error message
Sometimes, however, you purchase a computer legally with the promise that it comes with Windows, or you buy a Windows key from a key dealer. When you use it, you find out that Windows is marked as not genuine. This is particularly harsh, as you’ve gone out of your way to buy a copy of Windows, only to find that it’s counterfeit.
What do I do?
First, contact those who sold you the computer or key. Hopefully there was just a mistake within the transaction, and the person who sold you the product will take the steps necessary to rectify the problem.
If, however, you believe they may have intentionally sold you a counterfeit copy of Windows, you can report them using the Windows Piracy Reporting website. Microsoft will investigate your case and check to see if the person you bought it from is selling counterfeit computers. If you purchased the product using PayPal (such as on eBay), you can refute the purchase within forty-five days of buying it and get your money back.
3. If your copy of Windows was genuine but suddenly changed
Sometimes, a copy of Windows you know is genuine suddenly claims it’s not. If this sounds like you, first make sure that you have not changed any hardware within your PC. If you have, skip to the section below which may suit your needs better. Otherwise, see if the following tips manage to fix Windows’ not genuine errors.
What do I do?
First of all, checking the license can fix Windows’ not genuine errors. You can check it by right-clicking My PC and clicking “Properties,” then checking the “Windows activation” box at the bottom.
Sometimes it’ll let you know whats wrong with the license so you can fix it. Sometimes simply checking this screen then resetting your PC can fix any glitches in the licensing system.
If this doesn’t work, check if the Plug and Play policy is interrupting your licensing. Microsoft has detailed the steps you need to take to fix this here.
In some cases the result of a virus infecting your computer can corrupt the licensing. Make sure your computer is virus- and malware-free by running your favourite antivirus on your PC. Hopefully, if any viruses are found and removed, removing them should fix the issue.
If this doesn’t work, your best bet is probably re-activating your PC. Locate your Windows product key (and if you can’t, we have your back!) then either go through the official activation process or call Microsoft support and let them know of your predicament.
4. If you changed the hardware in your PC
Sometimes after you’ve changed a key component within your computer, you’ll be greeted with a “Windows is not genuine” error message, despite the fact that it was genuine before. What has probably happened here is that your PC’s Windows key was an OEM (Original Equipment Manufacturer) key. These keys aren’t like regular retail keys, as they’re only valid for the PC they’re installed on. As a result, they’re cheaper for computer manufacturers to use. As soon as the license detects it has changed computers, the key is invalid. Given you’ve changed the internal hardware within the PC, your license thinks it’s on a different computer and becomes invalid.
What do I do?
First of all, you need to ask yourself if you will you be changing your hardware frequently. If so, you may want to consider purchasing a retail copy of Windows instead. This allows you to modify the hardware within your PCwithout the license expiring.
If you’d rather not shell out for a copy of Windows, don’t fret just yet. You can call Microsoft support and let them know what happened and what you changed on your PC. If they deem your case as valid, they’ll help you reactivate your copy of Windows.
If you’re using Windows 10, you can avoid having to call customer support next time by linking your license to your Microsoft account. Then, when you change hardware and Windows gives its error, you can fix it with the click of a few buttons. Of course, you need to link your license before you change your hardware! Make sure to read Microsoft’s guide on the topic so you don’t have to go through this again.
Conclusion
As much as the “Windows is not genuine” error sounds like the operating system was pirated, sometimes a well-meaning or even legitimate user will see this error pop up. Now you know how to tackle and fix Windows’ not genuine errors should they appear for you.
Have you ever had a copy of Windows that either wasn’t genuine or claimed that it wasn’t? Let us know your stories (and fixes!) below
Critical Facebook security flaw allows hackers to log into multiple Facebook accounts
How to hack Facebook is the most popular search term on Google but a few go past learning to the actual hacking. However, one California-based hacker tried something similar. During his researcher he discovered a big security hole in Facebook’s password reset mechanism which allowed him to hack into anyone’s Facebook profile.
California based Gurkirat Singhdiscovered a way to gain access to anyone’s Facebook profile using a security flaw in the social networking giant’s password reset mechanism. The social networking giant uses an algorithm that generates a random 6-digit passcode ‒ that’s 10⁶ = 1,000,000 possible combinations.
“That could possibly mean that if 1 million people request a password within a short amount of time such that no one uses their code to reset the password, then 1,000,0001 person to request a code will get a passcode that someone from the batch has already been assigned,” Gurkirat explains in a blog post.
According to him, Facebook needs to store duplicate codes for multiple users if more than 1,000,000 users request a password reset. This means that more than two people have the same passcode. To use this for his purpose, Gurkirat Singh devised a way to send in 2 million password change requests to Facebook.
How I Could Have Hacked Multiple Facebook Accounts
Let’s get into the nitty-gritty. The only way you can reset your password on Facebook (if you’ve forgotten one) is through entering a 6…
hackernoon.com
After doing so, the 6-digit passcode needs to be matched using the Brute force technique. Singh added ID to the key ‘u’ and the successfully matched passcode to the key ‘n’ in the URL as www.beta.facebook.com/recover/password?u=…&n=… Doing so returned a match.
Once this was done, Singh added this matched passcode to the URL and was redirected to the password reset page. Singh immediately informed Facebook but to his surprise, Facebook security engineers designated this as a low priority risk and awarded in a token $500 bug bounty.
Since Facebook IDs are 15-digit long, Singh used 1,00,000,000,000,000 and made queries to Facebook Graph API to see which IDs were valid. This can only be done through authorized apps, and once a match is found, you can enter the ID in the URL like www.facebook.com/[ID]. The URL then automatically changes the ID to the username. This data was compiled into a JSON by Singh.
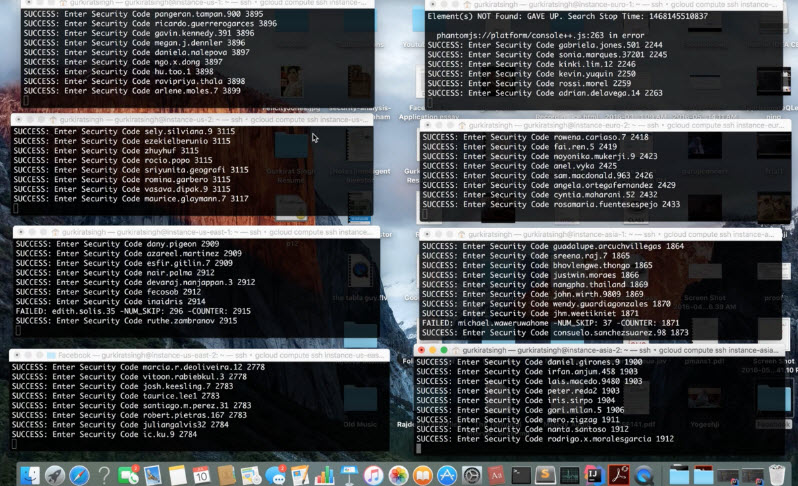
To handle the problem of IP changing, Gurkirat Singh simply used a proxy server that listened to HTTP Requests and then assigned a random IP address to each request. He used a multithreaded script to simulate user behaviour when a passcode is required. The script requests a passcode to every user in the JSON file created earlier. Then the scripts were run to make the requests. It looked like this:
It’s not an exaggeration to say that your smartphone is the most personal device you have. The fact it’s always with you, however, sure does generate a lot of information about your habits.
Your location history, Google searches, web browsing habits, app usage, and even recordings of your voice talking to the Google Assistant.
Yes, your phone and the Google services powering it are incredibly useful in many tangible ways. And if you use a strong password and two-factor authentication, your information is likely safer on Google’s servers than just about anywhere else.
But it’s not paranoia to take stock from time to time of just how much you’re handing over to Google or if you’d rather not place all your digital privacy eggs in the same basket. Here are some simple tips about how you can stay in control of all that critical information and ensure that privacy isn’t something you have to surrender.
Get right with Google
Since you’re on Android, using a Google account is essential in order to buy apps and use the company’s suite of services. Even the privacy-focused Blackphone puts Google services front and center.
If your goal is to maybe do a little de-Googling because you don’t want the company to know every thing about you, the first place to start is the My Activity account center. This is essentially the dashboard for every instance where your activity touches Google servers. The site is quite mobile friendly, so you can attack all these details from your phone or tablet as well as on the desktop.
GreenbotMy Activity is the home for everything Google remembers about your daily interactions.The amount of information is a little staggering, especially if this is your first time there. For example, touch “Android” and you’ll see a timeline of the interactions from your phone, such as which apps you’ve used on your phone, tablet, or Android TV. Same goes for Chrome, Search, or Play. There’s also a search function, which is surprisingly a little hit and miss at finding your stuff.
The key to this section is that you can also clean things out. Touch the overflow (three vertical dots) button at the top right and you’ll have an option to delete details by a certain timeframe. You can also opt for the nuclear option and delete everything if you want a fresh start.
GreenbotYou can delete activity from a specific time period or send everything to the digital trash bin at once.The most interesting addition to this section is found if you use the Google Assistant, which is what powers the artificial intelligence smarts inside the Pixel, Google Home, and Allo. Every voice interaction with Google is recorded, and you can play it back.
GreenbotYou can play back and also delete your voice interactions with the Google Assistant.It’s a little creepy to know your voice recordings are saved for all time. So you can delete this if you’d like. However, you’re better off acknowledging that this is one of the tradeoffs we make for having an artificial genie always at your disposal. It remembers.
This is where the “delete activity by” button can come in handy. It allows you to delete content from a specific application. Touch Filter by date & product and then select Assistant or any other app you want to seek out. This way all your voice searches, Google searches, or other interactions are sent away at once.
GreenbotYou can wipe away your voice commands all at once.Returning here often, just to see what's going on, is also a good idea as a way of ensuring your account is secure and nothing suspicious has taken place.
Location, location, location
So much of how your phone interacts with different apps and services is through your location. Think Google Maps, Google search suggestions, Uber, and other services.
One area you should check is your Google location history. This is a detailed timeline of everywhere your Android device has gone. It’s actually useful, as it’s helped me remember where I went on a certain day. However, it’s easy to understand that some may not want this saved for all time.
Head to Maps > Your timeline and you’ll see what Google has on you. Your location is saved in an attractive timeline by each day, and it even integrates with Google Photos to show which pictures you took by location.
GreenbotEvery move you make is traceable inside of Google Maps.You can tame this behavior, however. Head to Settings > Personal > Location. From here, you can see which apps have recently accessed your location. There’s also a switch to turn this off if there are particular apps you don’t want included or are turning into a battery drain.
GreenbotFind out which apps and devices are using Google’s location services.Keep in mind that shutting off all location-based tracking means no more regional tips from Google Now, gift card offers from Android Pay, or other location-based alerts. You’re also likely to get far fewer Opinion Rewards surveys since many of these come from your location.
You can also get more specific and turn on or off location services for specific apps or devices if you want more control. Phones, tablets, and PCs that have used your Google account tend to hang this feature around a while, and for security your best bet is to ensure you’ve wiped them properly before resale.
Go outside the circle
Along with tightening the reins on your Google account, you can also opt to go dark with some other apps and services you use.
Just like on the desktop, you can browse the web with Chrome in Incognito mode. It’s even easier if you have a Pixel as it’s one of the app shortcuts (press hand hold the Chrome icon). This doesn’t save any of your Google searches or web history to your account, however it doesn’t mean that you’re completely invisible. Your internet service provider and other information is still visible to the server you visit.
GreenbotGo Incognito mode if you want to browse without much of a trace.For even stronger private browsing, there’s a toolset for using Tor on Android. Orbot uses Tor to create a proxy and scramble your Internet traffic. You then use the Orbox browser to surf the web securely. It’s so secure, it won’t even let you take a screenshot of the browsing section.
More technical users can also dive into node configuration, bridges, and relays.
GreenbotTor browsing isn’t just for the desktop.If you want a more conventional solution, you can always opt out of the Chrome ecosystem by going with Firefox and a different search engine. The best mostly-private option is DuckDuckGo. Not only is it a solid search engine, but none of your search history or other details are saved by the company.
On the email front, you can get by with some more private alternatives to Gmail. One of the best is ProtonMail. It’s a popular, encrypted email service with the servers based in Switzerland. You’re not going to get all the cool tricks like travel itineraries in your Google Now feed, but you can rest assured that your email account is securely hosted.
GreenbotDuckDuckGo, Signal, and many other apps are good choices if you want to elevate your privacy.The other area that gets a lot of attention is messaging. There are many good, private messaging options for you. Personally I’m a fan of Signal, as I find it to have the best feature set and a robust development pace. It uses end-to-end encryption, which means that only the sender and recipient are able to see the message.
Privacy and security are just as much a mindset as they are about using specific apps, however. The real key is to think about apps that you interact with and what privacy tradeoffs you may be making for their services. In many cases it’s worth it. Yet as technology creeps ever more into our lives, it’s best from time to time to decide just how much is enough.


 Greenbot
 Greenbot
 Greenbot
 Greenbot
 Greenbot
 Greenbot
 Greenbot
 Greenbot
 Greenbot