Tuesday, April 25, 2017

Easy way to Run Android on Your Computer

Step One: Prep Your Drive (or Card) and Install Android


For this guide, you’ll need a USB drive or SD card that’s at least 2GB in size. Be sure to copy anything you want off of it, because you’ll need to format it as part of this process. So everything that’s currently on the drive will be lost forever. No pressure.

With all your data backed up, you’ll need a build of the Android x86 project from here. I’m testing the 64-bit version of Android 6.0, but feel free to pick which one works best for your current setup. Click the “view” button to start the download—depending on your internet connection speed, this could take a bit of time to finish.

2017-02-03_09h21_32

While that’s downloading, you’ll also want to download Rufus, a free Windows tool that will install Android onto the flash drive for us. It’s completely portable, so download and store it wherever you want—no installation necessary.

Once everything is finished, launch Rufus. You may get a warning from Windows asking if you want to allow Rufus to make changes to your device—just click “Yes.”

2017-02-03_09h24_30

With Rufus up and running, go ahead and choose your USB drive in the top dropdown box. this is a crucial step to get correct, since Rufus will erase the drive in question. If you have more than one removable drive inserted into your computer, double-check the drive letter to make sure you’re installing to the correct one!

2017-02-03_09h25_18

Next, make sure “FAT32” is selected from the File System dropdown.

2017-02-03_09h26_55

Lastly, tick the “Create bootable disc using” box, then select ISO Image from the dropdown.

2017-02-03_09h28_01

Click the little CD drive-looking icon next to “ISO Image” to select the Android x86 ISO file you downloaded earlier.

2017-02-03_09h28_45

Once your file has been selected, it will do a quick scan-check of the file to confirm all is well. Assuming everything checks out, you’re ready to install this thing. Click the Start button to make it happen.

2017-02-03_09h29_50

A dialog box should appear here letting you know that the file is an ISOHybrid image, which makes it can be written one of two ways: as an ISO or DD image. The default and recommended method—ISO Image—should be pre-selected. Go ahead and click “OK” to confirm.

2017-02-03_09h30_01

One more warning will appear to let you know that everything on the drive will be erased. Click “OK” to move forward, brave soldier.

2017-02-03_09h31_04

The process of installing the ISO to the drive shouldn’t take long at all. A green progress bar will show up at the bottom to let you know when the process has been completed. Once it’s done, you can close Rufus and remove your flash drive.

2017-02-03_09h31_58

Step Two: Boot From Your USB Drive


Next, you’ll want to boot your computer from that USB drive. You may have to alter some settings in the BIOS to do this, or your computer may allow it out of the box. You can read this guide for more info.

Provided everything is set up properly, you should be able to just start your PC and press a key like F10 or F12 to enter a boot menu (this may vary from computer to computer). From there, select your USB drive.

IMG_20170203_094130

After you get it all figured out, a menu will show up asking how you’d like to run the installation: Live CD mode or Install it to the hard disk. Since we’re just testing things out here, choose the first option to run Android x86 without installing it.

IMG_20170203_094227

After a few seconds, you should see the Android boot animation. Give it a few, and the setup menu will appear.

IMG_20170203_094558

Go ahead and follow the on-screen instructions to get logged in with your Google account—it’s all smooth sailing from here, just like setting up any other Android device.

IMG_20170203_0947561

Note: My test system glitched up pretty heavily during the setup process, but it was just visual—once I passed the login portion, it worked perfectly. You may or may not run into similar issues.

Screenshot_20170203-094915

Using Android x86 on Your Computer


If you’ve used Android before, you’ll find the experience to be exactly the same as a tablet or phone. The keyboard and mouse should work fine with Android, though using an operating system designed for touch with a mouse is always going to be slightly awkward. If you have a touch screen laptop, then the experience should feel much more natural.

Screenshot_20170203-095030

Here are a few additional pointers:

  • Touchpad gestures, like two-finger dragging and whatnot, will work perfectly in Android. Hover over the notification bar and drag down with two fingers—the notification shade should appear.

  • Long-pressing works exactly the same as on a touch device: just long-click the mouse. Right clicks won’t work.

  • The Windows key works as a home button—pressing it will send you right back to the home screen.

  • All media keys should also work out of the box. Volume, brightness, and track controls for music were flawless on my test system (a Dell XPS 13).

  • If your laptop has a webcam, that should also work with the camera app.

  • When you’re ready to exit Android x86, just hit your computer’s power button. The “Power Off” dialog will show up just like normal—power down, remove your USB drive, and restart the computer to get back into Windows.


Screenshot_20170203-100151

Your mileage may vary with all of these things depending on drivers and whatnot, but in my experience, everything worked swimmingly.

It’s also worth noting that this is still very much a beta project—plan on experiencing certain quirks and bugs during your use. You could use it as your daily operating system, but it doesn’t appear to be intended for that sort of use right now. But hey, you do you, man—if you like it, reboot from USB and choose the “install to hard disk” option and enjoy. Just make sure you back up your data first.
Friday, April 14, 2017

How to speed up a SmartPhone,Ipad & Tablets

Yes, we've become spoiled. We carry around devices that grant access to most of the world's knowledge, that provide entertainment and a surprising amount of computing power, and yet if that device doesn't pop right up with answers, we become quite frustrated. But sometimes it is good to be spoiled, which is why we're going to go over some reasons why your Android smartphone or tablet may be running slow and provide some solutions to make it run much faster.

The Quick Solution: Close Out of Apps


Mobile operating systems like Android and Apple's iOS do a good job of managing resources, but having a lot of apps open can still cause some slow downs. The first thing to try is simple closing out of the apps you are no longer using. You can close apps by tapping the task button, which is usually a square button either at the bottom of the display or just below the screen. This will bring up all of the most recent apps in a cascading style down the screen. Simply swipe up or down to move through the list and tap the X button in the upper right corner of each window to close the app.

Reboot the Device


If closing down apps doesn't cure the problem, a quick reboot should do the trick. It's a common mistake to think suspending the device by pressing the button on the side is actually powering off your Android smartphone or tablet. You will actually need to press this button for several seconds until a menu pops up offering you the choice to "Power off", or on some devices, "Restart".

After Android powers down, wait a few seconds and then press the button again to power it back on again. This is basically a cleaning process that will refresh the memory and reload the operating system, which should cure most problems.

Check Your Internet Speed


If your Android tablet or smartphone is still running slow after rebooting it, you might need to upgrade it, especially if it is several years old.

But before we go down that route, there are a number of different options we can try to clear up the problem. And the first option might come from an unlikely source: the Internet.


We do a lot of Internet-related tasks on our tablets and smartphones. We browse the web, check Email, find out what everyone is up to on Facebook, etc. And if our connection to the web is slow, our device will seem slow.

You can download the Ookla Speedtest app from the Google Play store to check the speed of your connection. The first thing to look at is your Ping time. This measure how long it takes to send a piece of information to the server and back and can be just as important as bandwidth. Anything under 100 milliseconds (ms) should be fine, with under 50ms being preferable. If you are over 200ms, you will experience noticeable delays.

Your download speed (bandwidth) should be at least 5 megabytes-per-second (Mbps) to stream video, and at least 8 Mbps is preferable to ensure a smooth experience. Many providers now offer anywhere from 20 Mbps to 80 or more. If you are under 5 Mbps, you will definitely want to check with your provider about upgrading.

The distance to your router can also cause issues. If your Internet is running slow, try moving closer to the router and checking the speed.

If you are getting slow speeds but believe it should be faster, you can try rebooting the router. Much like your tablet or smartphone, a reboot can allow the router to have a fresh start, which can help it run faster. Read more on troubleshooting a weak Wi-Fi signal.


Disable Widgets


We've closed out of apps, rebooted and check the Internet connection. It's now time to take a look at widgets, those helpful mini-apps that can sometimes eat up too many resources. A few widgets like a clock or Chrome bookmarks can be great additions to your home screen, but remember, every widget is running in real time when you are using your device.

If you've installed a number of widgets, try cutting back by disabling a few.


You can remove a widget by pressing your finger down on the widget and holding it down until it move with your finger. A "Remove" section should appear on the home screen. Simply drag the widget to the remove section and drop it. If no remove section appears, try dragging the widget off the screen and dropping it, a process that works with some older devices.

Update to the Latest and Greatest Version of Android


Newer versions of the Android operating system can help out by providing fixes to security holes and correct issues with how resources like memory and storage space are optimized. If you've rebooted your device and checked your Internet speed with no luck, you should make sure you are running the latest and greatest version of the operating system.

  • First, launch the Settings app from the app page.

  • Scroll all the way to the bottom of the Settings and tap on "About smartphone" or "About tablet".

  • Tap "System Upgrade", which should be at the top of the screen. Your device will display whether or not you are on the latest version of Android and provide you with an upgrade button if needed.


Unfortunately, this can be an iterative process. Once you upgrade to a newer version of the operating system, you will want to go through those steps again to check if you have upgraded to the latest. You may need to step through several upgrades to get your operating system up to date. And while you wait for those updates to install, you can read up on some useful shortcuts for Android.

Remove Bloatware


Bloatware has become a major issue with Android, with different manufacturers adding sometimes up to a dozen or more apps to the standard ones that come with Android. If you have a Samsung smartphone or tablet, you may have a number of duplicate apps such as Samsung digital stores in addition to Google Play stores. And not all of these apps are harmless. Some may launch automatically when you boot up your device, using up memory and taking up CPU cycles.

Unfortunately, you probably won't be able to outright uninstall these apps. But you can disable them. You can do this by launching the Settings app, tapping Apps and then tapping the app you want to disable. If it is an app you downloaded from the Google Play store, the button at the top will read "Uninstall" rather than "Disable". If you are consistently having performance issues, it is a good idea to disable any apps that came with the device that you never use.

Read more about managing Bloatware on your Android tablet or phone.

Disable Live Wallpaper


If you have a 'live' or animated wallpaper, it's a good idea to switch to a static background if you are having performance issues. You can choose your wallpaper by opening the Settings app, choose Display and then tapping on Wallpaper. It's better to use one of the default "Wallpapers" or a photo rather than choosing something from "Live Wallpapers".

Clear the App Cache


Apps sometimes download graphics and other bits of data from the Internet to store on your device to increase speed, but sometimes, this 'cache' of data can actually hurt performance. The data cache can contain temporary files that are no longer used, or worse, corrupted files that can cause disruptive issues. If you are having issues with your smartphone or tablet, it can be a good idea to clear the cache. The unfortunate side effect is that you may be asked to log into apps again, and the first time you boot into the app, it may take a bit longer to load. But clearing out the cache can result in an overall improvement to performance.

  • First, launch the Settings App.

  • Scroll down and Choose Storage.

  • You should see "Cached data" or "App cache" in the list.

  • After you tap on "Cached data", you will be prompted to clear the data for all apps. Choose OK.


Should You Worry About Freeing Up Storage Space?


Clearing up storage space is a common bit of advice for improving performance, but in reality, this will only improve performance if you are running very low on free space for your internal storage. You can check how much free space you have by opening the Settings app and tapping on Storage. If you have under 1 GB, you may want to delete apps you no longer to use to give the Android operating system a little more breathing room. Otherwise, this isn't something you need to worry about.

Still Running Slow?


The last thing you can try before biting the bullet and buying a new device is to restore your Android device to factory default. This will put it into the same basic state it was in when you first bought it, which should clear up any problems that are causing performance issues. However, if your tablet or smartphone is simply too old, it may start running slow again as you fill it up with modern apps.

You can restore your Android device to factory default by opening the Settings app, choosing "Backup and reset" and then tapping "Factory data reset". Find out more about resetting your Android device.

Tuesday, April 4, 2017

How to turn your Windows 10 PC into a wireless hotspot without any Software (CMD Trick)

To follow this guide, you'll need to open the Command Prompt with administrator rights. To do this, use the Windows key + X keyboard shortcut, and select Command Prompt (Admin).

How to check if your wireless adapter supports Hosted Networks in Windows 10


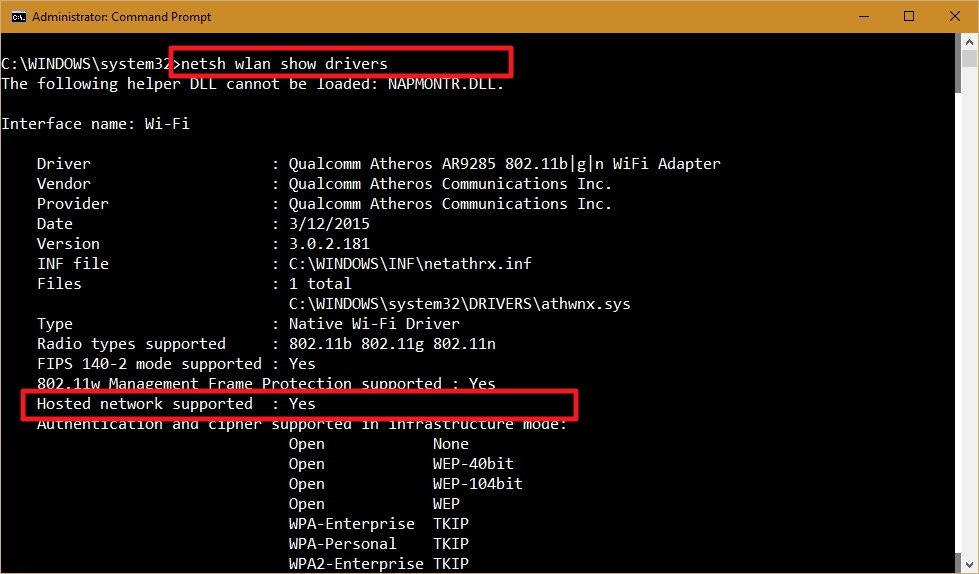
While some adapters include support for Hosted Network, you will first need to verify your computer's physical wireless adapter supports this feature using the following command:

NETSH WLAN show drivers


If the generated output shows Hosted network supported: Yes, then you can continue with the guide. If your wireless adapter isn't supported, you could try using a USB wireless adapter that supports the feature.

How to create a wireless Hosted Network in Windows 10


Creating a wireless hotspot in Windows 10 is relatively straightforward — don't let the command line scare you. Simply follow the steps below to configure a wireless Hosted Network:

  1. While in Command Prompt (Admin) enter the following command:NETSH WLAN set hostednetwork mode=allow ssid=Your_SSID key=Your_PassphraseWhere the SSID would be the name you want to identify your wireless network when trying to connect a new device, and the passphrase is the network security key you want users to use to connect to your network. (Remember that the passphrase has to be at least 8 characters in length.)


  2. Once you created a Hosted Network, enter the following command to activate it:NETSH WLAN start hostednetwork


How to share your internet connection with a Hosted Network in Windows 10


Up to here, you created and started a Hosted Network in your Windows 10 PC. However, any wireless capable device won't be able to access the internet just yet. The last thing you need to do is to share an internet connection using the "Internet Connection Sharing" feature from a physical network adapter.

  1. Use the Windows key + X keyboard shortcut to open the Power User menu, and selectNetwork Connections.

  2. Next, right-click the network adapter with an internet connection – this could be a traditional Ethernet or wireless network adapter — select Properties.Note: In Network Connections, you should now see a new our new Microsoft Hosted Virtual Adapter which is labeled Local Area Connection* X, and with the SSID name.

  3. Click the Sharing tab.

  4. Check the Allow other network users to connect through this computer's Internet connection option.

  5. Next, from the Home networking connection drop-down menu select the Microsoft Hosted Virtual Adapter.

  6. Click OK to finish.


At this point, you should be able to see and connect any wireless capable device to the newly created software access point, and with access to the internet.

How to stop sharing an internet connection with other devices in Windows 10


If you want to temporary stop allowing other devices to connect wirelessly through your computer, you can type the following command in the Command Prompt and hit Enter:

NETSH WLAN stop hostednetwork


At any time, you can just use the start variant of the command to allow other devices to connect to the internet using your computer as an access point without extra configuration:

NETSH WLAN start hostednetwork


Similarly, you can also use the following command to enable or disable a wireless Hosted Network:

NETSH WLAN set hostednetwork mode=allow

NETSH WLAN set hostednetwork mode= disallow

How to change a Hosted Network settings in Windows 10


In the case you want to change some of the current settings, such as SSID or network security you can use the following commands:

NETSH WLAN set hostednetwork ssid=Your_New_SSID

NETSH WLAN set hostednetwork key=Your_New_Passphrase

How to view the current Hosted Network settings


There are two commands to view the Hosted Network settings on your computer:

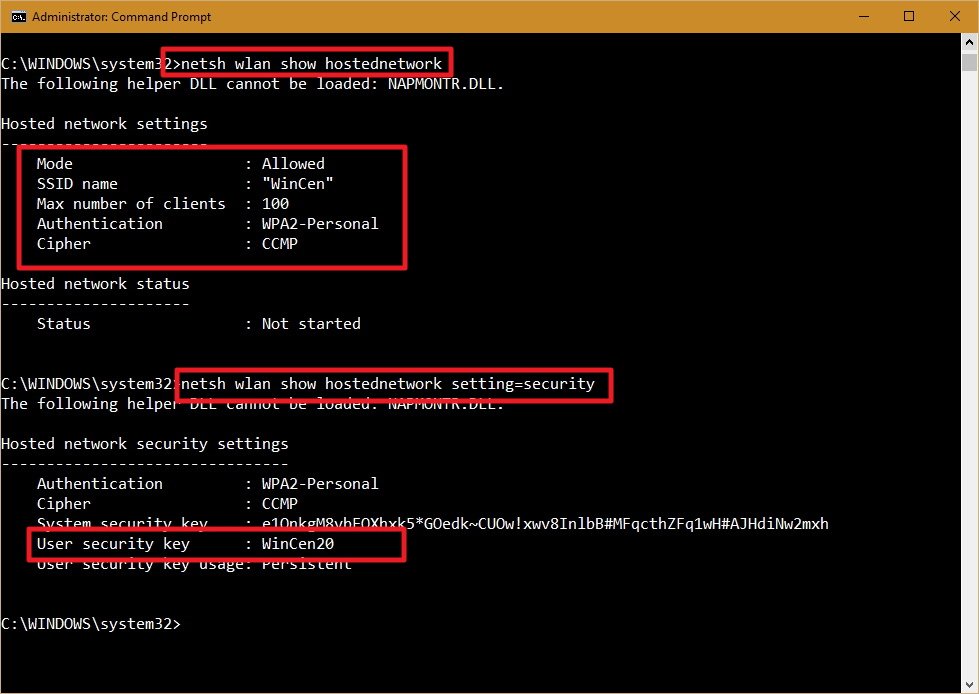
The following command shows the mode and SSID name in use, max number of clients that can connect, type of authentication, and cipher:

NETSH WLAN show hostednetwork

And the following command will also reveal the current network security key among other settings, similar to the previous command:

NETSH WLAN show hostednetwork setting=security


How to disable a wireless Hosted Network in Windows 10


While the setup of a wireless Hosted Network in Windows 10 is not very complicated, Microsoftdoesn't make very straightforward to remove the configurations when you no longer need the feature.

Although you can use the stop or disallow commands, these actions won't eliminate the settings from your computer. If you want completely delete the Hosted Network settings in Windows 10, you'll need to modify the Registry.

Important: Before you change anything settings on your computer, it's worth noting that editing the Windows Registry can be a dangerous game that can cause irreversible damages to your system if you don't know what you are doing. As such, it's recommended for you to make a full backup of your system or at least System Restore Point before proceeding with this guide. You have been warned!

  1. Open the Start menu, do a search for regedit, hit Enter, and click OK to open the Registry with admin rights.

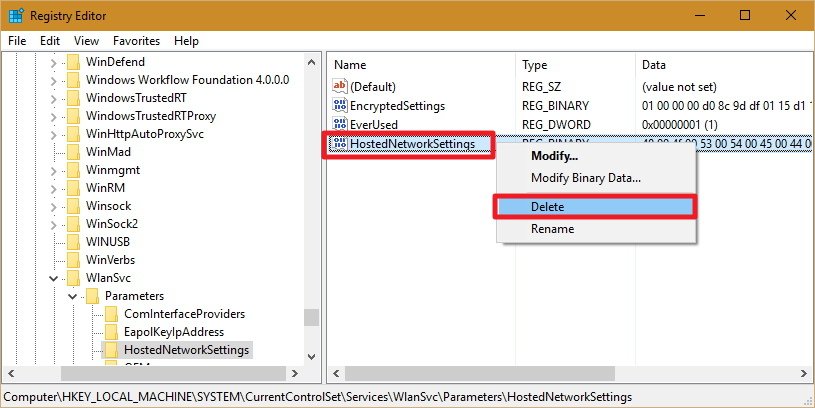
  2. Scroll down the following path in the Registry:HKEY_LOCAL_MACHINE\system\currentcontrolset\services\wlansvc\parameters\hostednetworksettingsRight-click the HostedNetworkSettings DWORD key, select Delete, and click Yes to confirm deletion.


  3. Restart your computer

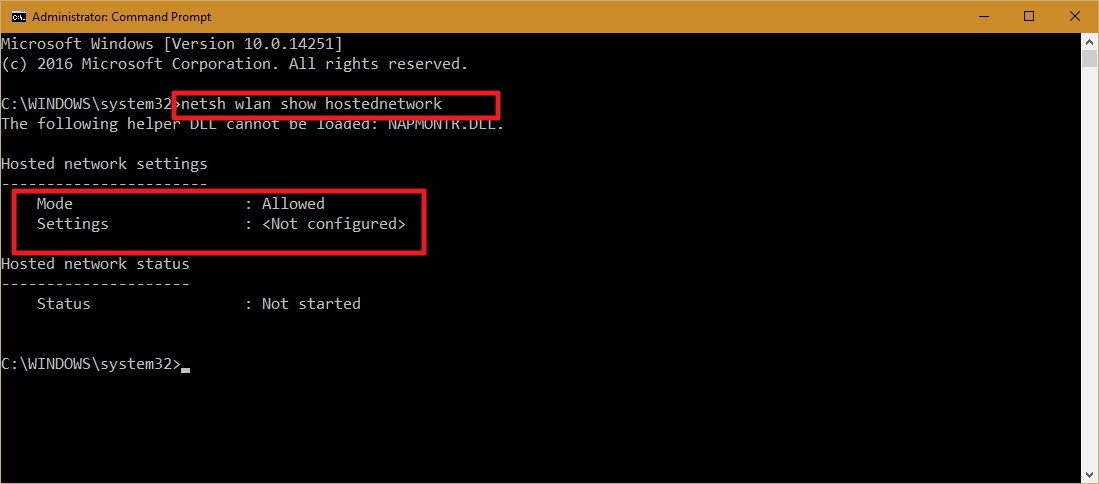
  4. Open to the Command Prompt and use the following command:NETSH WLAN show hostednetworkYou will know that you have successfully deleted the settings when the Settings field readsNot configured.


  5. Make sure you turn off "Internet Connection Sharing" in the physical network adapter that was sharing the internet with other devices. Use the Windows key + X keyboard shortcut to open the Power User menu, and select Network Connections.

  6. Right-click the network adapter, and select Properties.

  7. Click the Sharing tab.

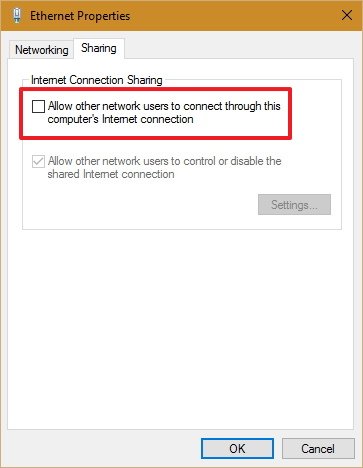
  8. Uncheck the Allow other network users to connect through this computer's Internet connection option.

  9. Click OK to complete the process.


Things you need to know


Although the wireless Hosted Network feature in Windows 10 allows you to implement an access point solution to share an internet connection with other devices, it's not meant to be a solution to replace a physical wireless access point.

Also, there are a few things you want to consider. For example, wireless speeds will dramatically be reduced compared to the rates provided from a physical access point. Perhaps it would not be a big deal for internet browsing, but downloading or transferring big files could be an issue for some users.

You also need to consider that your computer needs to be always turned on to act as a wireless access point. If the computer enters into sleep, hibernate, or restarts, your wireless hotspot will stop working, and you will need to start manually the feature using the NETSH WLAN start hostednetwork command.

You cannot run a SorftAP and ad hoc at the same time on Windows. If you need to create a temporary network connection between two computers, setting up ad hoc will turn off SoftAP — you can run one or the other, not both at the same time.

Wrapping things up


Wireless Hosted Network is a nifty feature in Windows can be a great tool to have for when you need to create a wireless access point on the go. It won't match the performance of a physical wireless access point, but it can be useful for many unexpected scenarios — like having one wired ethernet connection and several devices you want to get online. It's not a replacement for the real thing, but in a sticky situation, it can be just the fix you need.